Harnessing the Power of RV Inverters: A Guide for Campers and Van Dwellers
Whether you're a seasoned road warrior with a luxury RV, a bohemian van lifer with a well-outfitted rig, or a weekend camper looking to add some home comforts to your travel trailer, understanding and utilizing power inverters is a game changer.
When it comes to managing electricity in your RV, camper, or van, power inverters are key components that can convert the DC power stored in your batteries into AC power - the type of power you use in your home. This conversion allows you to run your laptop, TV, coffee maker, or even air conditioner while you're out enjoying the freedom of the open road. Let's explore in more detail how these marvelous devices work and what you need to consider when installing one in your mobile home away from home.
Understanding RV Power Inverters
In simplest terms, an RV power inverter takes the 12-volt DC power from your vehicle's battery and converts it into 120-volt AC power, just like what you get from a household electrical outlet. This transformed power is then used to run your AC appliances and charge your devices without the need for a generator or an external power source.
There are two main types of RV inverters: modified sine wave and pure sine wave inverters.
Modified Sine Wave Inverters
Modified sine wave inverters are the more budget-friendly option. They're great for running simpler appliances such as heaters and lights. However, they can have trouble powering more sensitive electronics, like laptops or smart TVs, which can lead to decreased performance or even damage over time.
Pure Sine Wave Inverters
Pure sine wave inverters, on the other hand, produce a clean and smooth power output that closely resembles the power you'd get from your home outlet. These inverters are ideal for running sensitive electronics and appliances that demand high power, like microwaves, refrigerators, and air conditioners. Although pure sine wave inverters come at a higher price point, they are definitely worth considering if your RV, camper, or van lifestyle involves high-end appliances or if you work on the road with sensitive electronic equipment.
Choosing the Right Inverter for Your Camper or Van
Selecting the right inverter for your camper, van, or RV depends on your power needs and the types of appliances you plan to run. To calculate your power needs, make a list of all the appliances and electronics you want to use, note their wattage, and add it all together. Be sure to account for any surge power requirements, as some appliances need an extra power boost when they first start up.
Also, consider your travel lifestyle. If you mostly stay in RV parks with shore power available, you might not need a large inverter. But if you enjoy boondocking or dry camping, where there's no power source but your batteries and solar panels, you'll need a more robust system.
Budget Inverters ($100-$200 range): These inverters are usually compact and portable, with power ratings ranging from 300 to 1000 Watts. They often include basic features such as overload protection and low-battery shutdown. However, they might lack some of the more advanced features and might not be as efficient or durable as higher-priced options. An example in this range would be a simple 100W pure sine wave inverter.
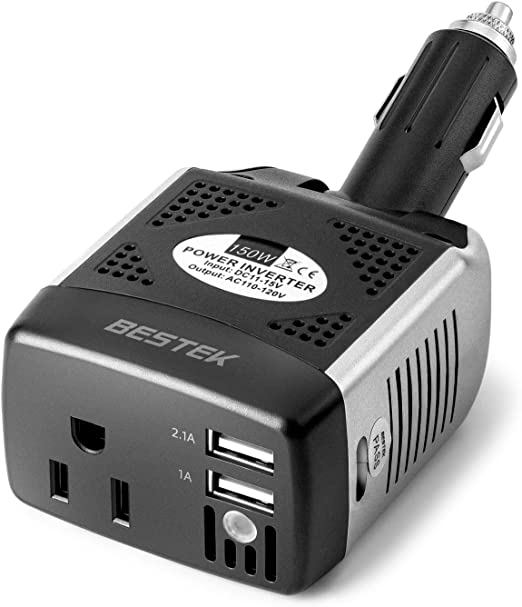
BESTEK 150W Power Inverter 12V
The BESTEK power inverter is a budget-friendly device that converts 12V DC power into 110V AC power, allowing you to use electronic devices in your car that usually require a wall outlet. It is equipped with dual USB ports, ensuring that you can charge multiple devices simultaneously.
Mid-Range Inverters ($200-$500 range): These inverters often have power ratings from 1000 to 3000 Watts and can support more appliances simultaneously. They may offer more advanced features such as remote controls, integrated USB ports, more sophisticated cooling systems, and improved efficiency. You might find more pure sine wave inverters in this range, providing cleaner power that's better for sensitive electronics. An example in this range would be a 2000W pure sine wave inverter with remote control.
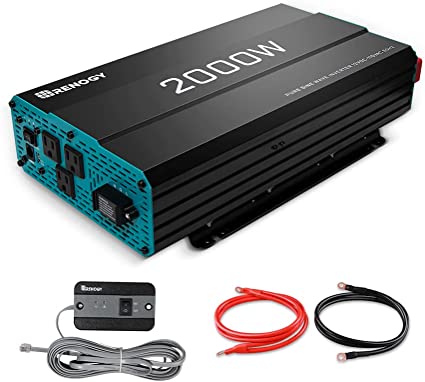
Renogy 2000W Pure Sine Wave Inverter 12V DC
The Renology 200W Pure Sine Wave inverter is a high-quality medium-budget inverter that converts 12V DC power into 110V AC. High power output allows using many conventional kitchen appliances such as stoves or ovens in the RV. Equipped with multiple sockets allows direct connecting appliances to the inverter.
High-End Inverters ($500 and above): These inverters are typically rated at 3000 Watts and above, supporting a wide array of appliances. They often come with a host of advanced features like built-in transfer switches, advanced diagnostic abilities, and high surge capacities. The inverters in this range are typically more durable and efficient, capable of handling heavy-duty power needs. An example in this range would be a 3000W pure sine wave inverter with an integrated transfer switch.
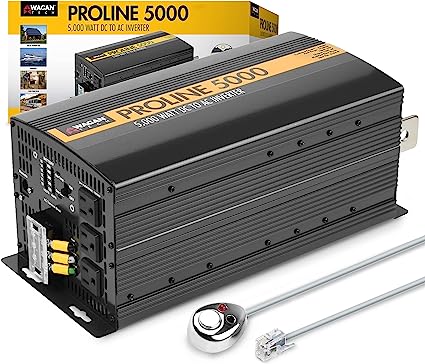
Wagan EL3744 12V 5000 Watt Power Inverter
The high-end power RV inverter from Wagan.
A compact and lightweight device that offers a power output of 5,000 watts with a surge capacity of 10,000 watts. The inverter comes equipped with three AC outlets, a high-output AC terminal block, and heavy-duty solid-mount terminals. A remote power switch is included for convenient operation. To ensure safe use, it includes built-in protections against overloading, overheating, low battery, short circuit, and reverse polarity.
Keep in mind that features, functionalities, and price can vary widely depending on the brand, model, and where you purchase the inverter. Always take the time to research and read reviews to ensure you're getting a product that suits your specific needs.
Installation Considerations
Once you've determined your power needs and chosen your inverter, the next step is installation. It's recommended to install your inverter as close to the battery as possible to minimize energy loss. Remember, inverters can generate heat, so they need to be installed in a well-ventilated area.
Additionally, the installation of an inverter is not a beginner-level DIY project. It involves working with high voltages and should only be undertaken if you're confident in your skills. If not, it's best to seek the help of a professional.
When installing a power inverter in your RV, camper, or van, there are several considerations to keep in mind to ensure the system works efficiently and safely. Here's a closer look:
- Inverter Size: Choose the right size of inverter based on the total power needs of the appliances you plan to run. Make sure the inverter can handle the combined wattage of all devices, including the starting wattage or surge power.
- Location of Installation: The inverter should be installed in a well-ventilated, cool, and dry place to prevent overheating. Avoid placing it near flammable materials or in direct sunlight. The location should be easily accessible for maintenance and inspection but away from areas where it could be accidentally damaged.
- Battery Distance: Ideally, the inverter should be installed as close to the batteries as possible to minimize the length of the DC cables and reduce potential power loss. However, it should not be in the same compartment as the batteries to avoid exposure to corrosive gases released by some battery types.
- Proper Grounding: The inverter must be correctly grounded to the vehicle's chassis as per the manufacturer's instructions. Grounding helps to prevent electrical shocks in case of a short circuit.
- Cable Sizing: Cables connecting the battery to the inverter must be appropriately sized. Undersized cables can overheat, causing a potential fire hazard. The larger the inverter's power and the longer the cable, the thicker (or lower gauge) the cable should be.
- Fuses and Circuit Breakers: For safety, install an appropriate fuse or circuit breaker between the inverter and battery. This protective device should be placed as close to the battery as possible to protect the cabling from potential short circuits.
- Mounting Orientation: Follow the manufacturer's instructions on how to mount the inverter. Some inverters are designed to be mounted in specific orientations for optimal performance and cooling.
- Multiple Outlets: If you want to power multiple devices, consider an inverter model with multiple outlets or install additional wall sockets.
- Professional Installation: If you are not comfortable with the installation process, consider hiring a professional. They can ensure the inverter is installed correctly and safely, potentially saving you from future problems.
- Safety: Always prioritize safety when installing a power inverter. Disconnect all power sources before beginning the installation and carefully follow all manufacturer instructions.
By considering these aspects of inverter installation, you'll ensure your RV, camper, or van's power system is safe, efficient, and ready to meet your needs while on the road.
Fitting the power inverter and battery bank capacity
The size of your battery bank is an essential consideration when installing a power inverter in your RV, camper, or van. The battery capacity should match your energy needs and the capacity of your inverter. Here's a general guideline on how to determine the appropriate battery capacity:
- Calculate Your Energy Needs: First, you need to calculate how much energy you will be using. This is typically measured in watt-hours or kilowatt-hours (kWh). For example, if you have a 100-watt device that you use for 5 hours a day, you'll need 500 watt-hours or 0.5 kWh per day.
- Account for Inverter Efficiency: Inverters aren't 100% efficient. Depending on the model, efficiency can range between 85% to 95%. So, if you need 0.5 kWh per day and your inverter's efficiency is 90%, your actual energy need is 0.5 kWh / 0.9 = 0.56 kWh.
- Convert to Ampere-hours: Batteries are typically rated in ampere-hours (Ah). To convert your daily energy need from kWh to Ah, divide by your battery voltage (usually 12 volts for RVs, campers, or vans) and multiply by 1000 (since 1kWh equals 1000 watt-hours). So, if your daily energy need is 0.56 kWh, you'll need 0.56 * 1000 / 12 = 46.67 Ah per day.
- Consider Battery Discharge Depth: To extend your battery's lifespan, it's generally recommended not to discharge lead-acid batteries below 50%. So, you'll need to double your Ah per day calculation. In our example, you'd need a battery capacity of 46.67 * 2 = 93.33 Ah.
- Plan for Autonomy Days: If you're planning to camp without a charging source (like shore power or solar panels) for multiple days, you need to account for these "autonomy days". Multiply your required battery capacity by the number of autonomy days. For example, if you want to have enough energy for three days, you'd need a battery capacity of 93.33 Ah * 3 = 280 Ah.
- Battery Bank Sizing: Since it's unlikely you'll find a single battery with the exact Ah rating you need, you'll probably need to create a battery bank with multiple batteries. Remember that connecting batteries in parallel increases total capacity (Ah), but voltage stays the same. In contrast, connecting batteries in series increases the voltage, but the capacity stays the same.
Always use deep-cycle batteries for your RV, camper, or van. They're designed for regular deep discharging and recharging, unlike car batteries, which are meant for providing short bursts of high current.
Please remember these are general guidelines and actual battery capacity needs might differ based on your specific circumstances and energy usage patterns.
Maintenance and Safety Tips
Maintaining your inverter ensures its longevity and optimal performance. Regularly inspect your inverter for any dust or debris build-up and keep it clean. Monitor the device's temperature and performance regularly to detect any potential issues early. And don't forget, safety first! Always disconnect all power sources before performing maintenance on your inverter.
In addition to maintaining your inverter, you should also pay attention to your battery’s health. Your inverter's performance is directly tied to your battery's condition. A weak or old battery can lead to inefficient inverter operation and damage over time. Regularly check your battery’s state and replace it when necessary.
Here are some safety tips you should keep in mind:
- Proper Installation: Ensure your inverter is correctly installed, ideally by a professional. Improper installation can lead to electrical shocks or fires.
- Right Location: Install your inverter in a dry, well-ventilated area. Overheating can cause inverters to malfunction or even cause a fire. Keep it away from any flammable materials.
- Proper Grounding: Always ensure your inverter is properly grounded. Grounding helps protect you from electrical shocks if there's a short circuit.
- Disconnect Power During Maintenance: Always disconnect all power sources before performing maintenance or repair work on your inverter. This includes unplugging from shore power, turning off the inverter, and disconnecting the batteries.
- Avoid Overloading: Never exceed the power rating of your inverter. Overloading can cause the inverter to overheat, leading to failure or even fire.
- Battery Care: Use the right type and size of battery, and maintain it properly. A weak or wrong type of battery can affect the inverter's performance and lifespan.
- Regular Inspections: Regularly inspect your inverter for any visible damage or wear and tear. If you see any signs of damage, get it repaired or replaced immediately.
- Use Proper Wiring and Fuses: Use the appropriate size and type of wiring to prevent overheating and potential fire hazards. Also, ensure that the inverter's output is protected by a correctly rated fuse.
- Avoid Moisture: Keep the inverter away from any sources of moisture. Contact with water can cause short circuits and electrical shocks.
- Understanding Your Device: Lastly, understand the workings and limits of your inverter. Read the user manual thoroughly and follow the manufacturer's instructions for use.
Taking these safety precautions can help you enjoy the convenience of your inverter while ensuring you and your RV, camper, or van remain safe.
Finally, remember that inverters can drain your battery quickly if you're not careful. Be mindful of your power consumption, particularly when you're boondocking or dry camping. Consider pairing your inverter with solar panels or a generator for a sustainable power source.
Can you attach a wall socket to the inverter?
Attaching a wall socket to your RV, camper, or van's power inverter is not only possible but also highly useful for powering household appliances and devices while on the road. It allows you to convert the DC power from your battery into AC power, similar to what you'd get from a wall outlet at home. With this setup, you can enjoy the convenience of using your everyday electronics from the comfort of your mobile abode.
The process of attaching a wall socket to the inverter involves wiring the socket to the inverter's output terminals and mounting the socket onto the wall. Though this is a relatively straightforward procedure, it should be approached with caution, as working with electricity can be hazardous. It's recommended to seek professional help if you're unsure about the process. Once set up, the socket can power multiple devices simultaneously, provided their total power draw doesn't exceed the inverter's capacity.
Can you connect multiple devices in a single inverter?
You can use multiple devices at the same time on your RV, camper, or van inverter, provided that the total wattage of all devices combined doesn't exceed the capacity of your inverter.
When planning to use multiple devices concurrently, there are a few important considerations:
- Calculate Your Power Needs: To figure out if your inverter can handle multiple devices at once, you need to add up the wattage of all the devices you plan to use simultaneously. Keep in mind that some appliances have a higher starting wattage (also known as "surge power") than their operating wattage. Always use the higher number for your calculations to ensure you don't overload your inverter.
- Inverter Capacity: If your combined wattage exceeds the inverter's rated power, you risk overloading and damaging the inverter. You also need to consider the inverter's surge capacity - its ability to handle a brief overload when appliances start up. If you plan to run multiple high-wattage devices concurrently, consider investing in an inverter with a higher power rating.
- Battery Bank: Remember, the inverter draws power from your batteries. If you're using multiple devices at once, you'll deplete your batteries faster. So, you also need to ensure your battery bank can handle the demand. Monitor your battery levels closely to avoid completely draining them.
- Balancing Load: It's better to distribute your electrical load evenly across all available outlets. Most inverters have more than one outlet, so don't plug everything into the same socket.
- Energy Management: To reduce the load on your inverter and battery, practice good energy management. This means only running necessary devices at the same time and turning off any devices that are not in use. For instance, you might decide to run the microwave only when the air conditioning is off.
Always ensure you are aware of the power draw of your appliances and the capabilities of your inverter. Understanding how to manage your power usage will help you get the most out of your RV, camper, or van inverter while protecting your equipment and ensuring you have power when you need it.
Wrapping Up
A power inverter is an essential tool for any RV, camper, or van adventurer looking to enjoy the comforts of home on the road. Understanding the types of inverters available and how to choose, install, and maintain the right one for your needs can significantly enhance your on-the-road lifestyle.
Always remember, choosing the perfect power inverter goes beyond just wattage and price. Consider your overall lifestyle, the type of appliances you have, and where you'll be spending most of your time. By understanding your needs, you can make an informed decision, ensuring you always have the power you need, right at your fingertips.